Testing LLM-Based Applications

As AI systems powered by Large Language Models (LLMs) become increasingly central to modern applications, the need for robust testing frameworks has never been more critical. In this article, I'll explore practical approaches to testing generative AI applications, with a special focus on using DeepEvals to ensure your LLM systems perform reliably.
The Challenge of Testing Generative AI
Testing traditional software typically involves deterministic inputs and outputs—given the same input, you expect the same output every time. LLMs, however, introduce an element of stochasticity. The same prompt can generate different responses, making traditional testing methodologies insufficient.
Let's explore key testing techniques specifically designed for LLM-based applications.
Essential Testing Techniques for LLM Applications
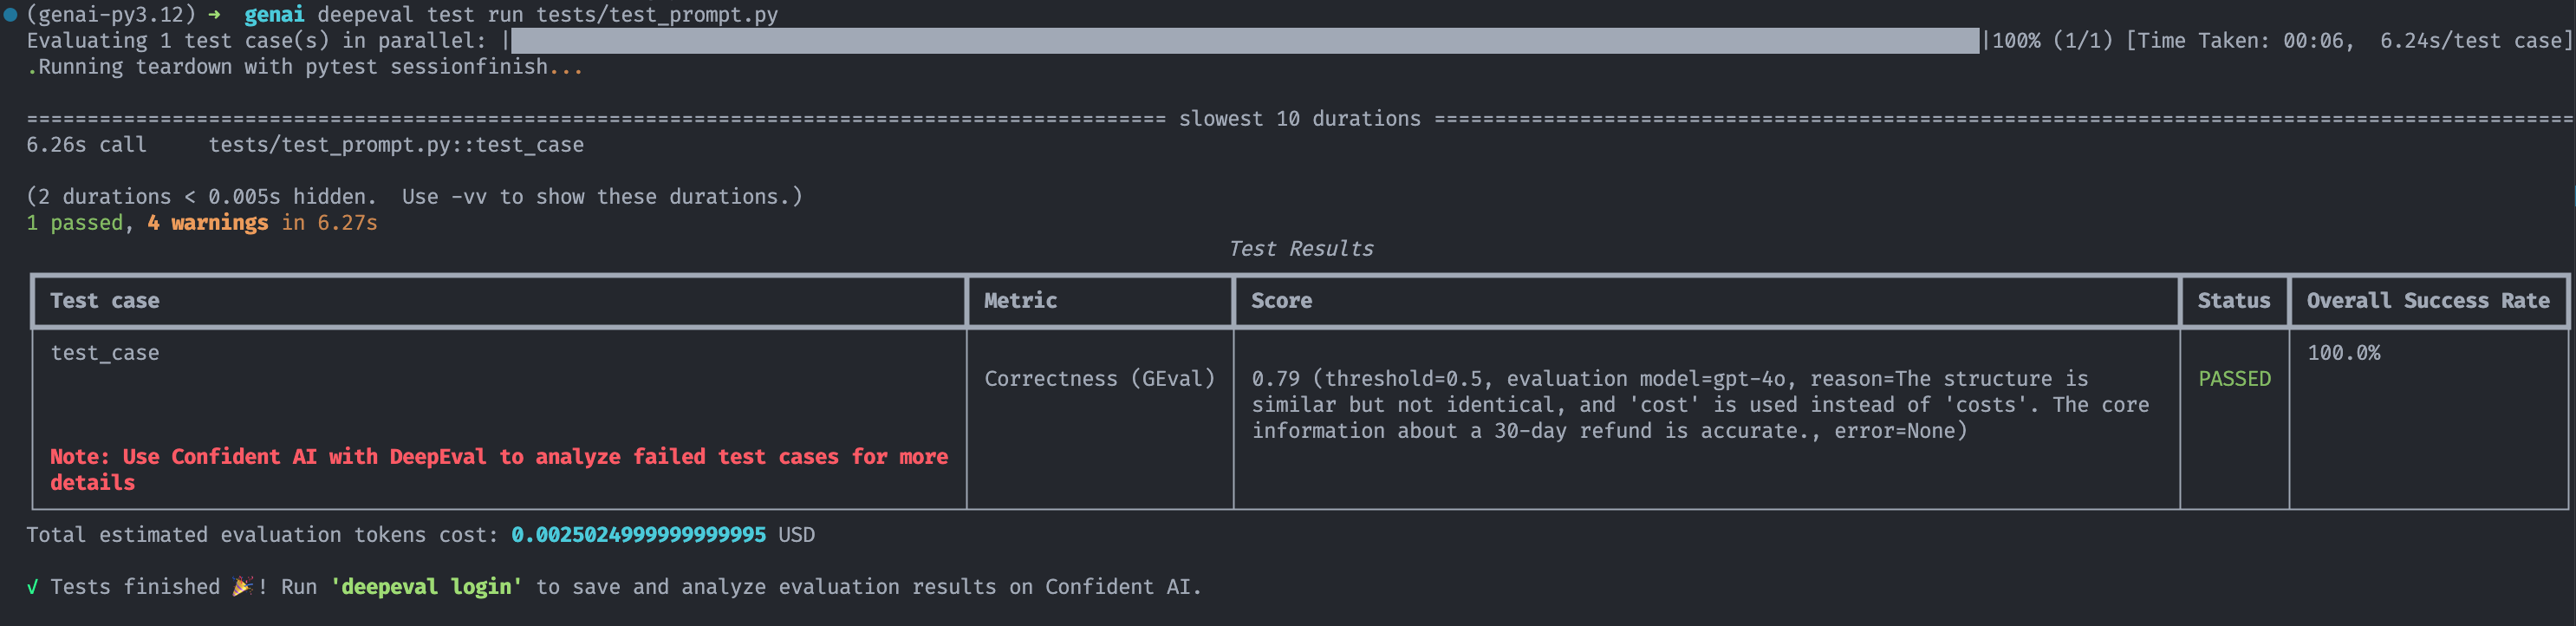
1. Prompt Testing
Prompt testing involves verifying that your carefully crafted prompts elicit the desired behavior from the underlying models.
Example with DeepEvals:
import pytest
from deepeval import assert_test
from deepeval.metrics import GEval
from deepeval.test_case import LLMTestCase, LLMTestCaseParams

def test_case():
    correctness_metric = GEval(
        name="Correctness",
        criteria="Determine if the 'actual output' is correct based on the 'expected output'.",
        evaluation_params=[LLMTestCaseParams.ACTUAL_OUTPUT, LLMTestCaseParams.EXPECTED_OUTPUT],
        threshold=0.5
    )
    test_case = LLMTestCase(
        input="What if these shoes don't fit?",
        # Replace this with the actual output from your LLM application
        actual_output="You have 30 days to get a full refund at no extra cost.",
        expected_output="We offer a 30-day full refund at no extra costs.",
        retrieval_context=["All customers are eligible for a 30 day full refund at no extra costs."]
    )
    assert_test(test_case, [correctness_metric])
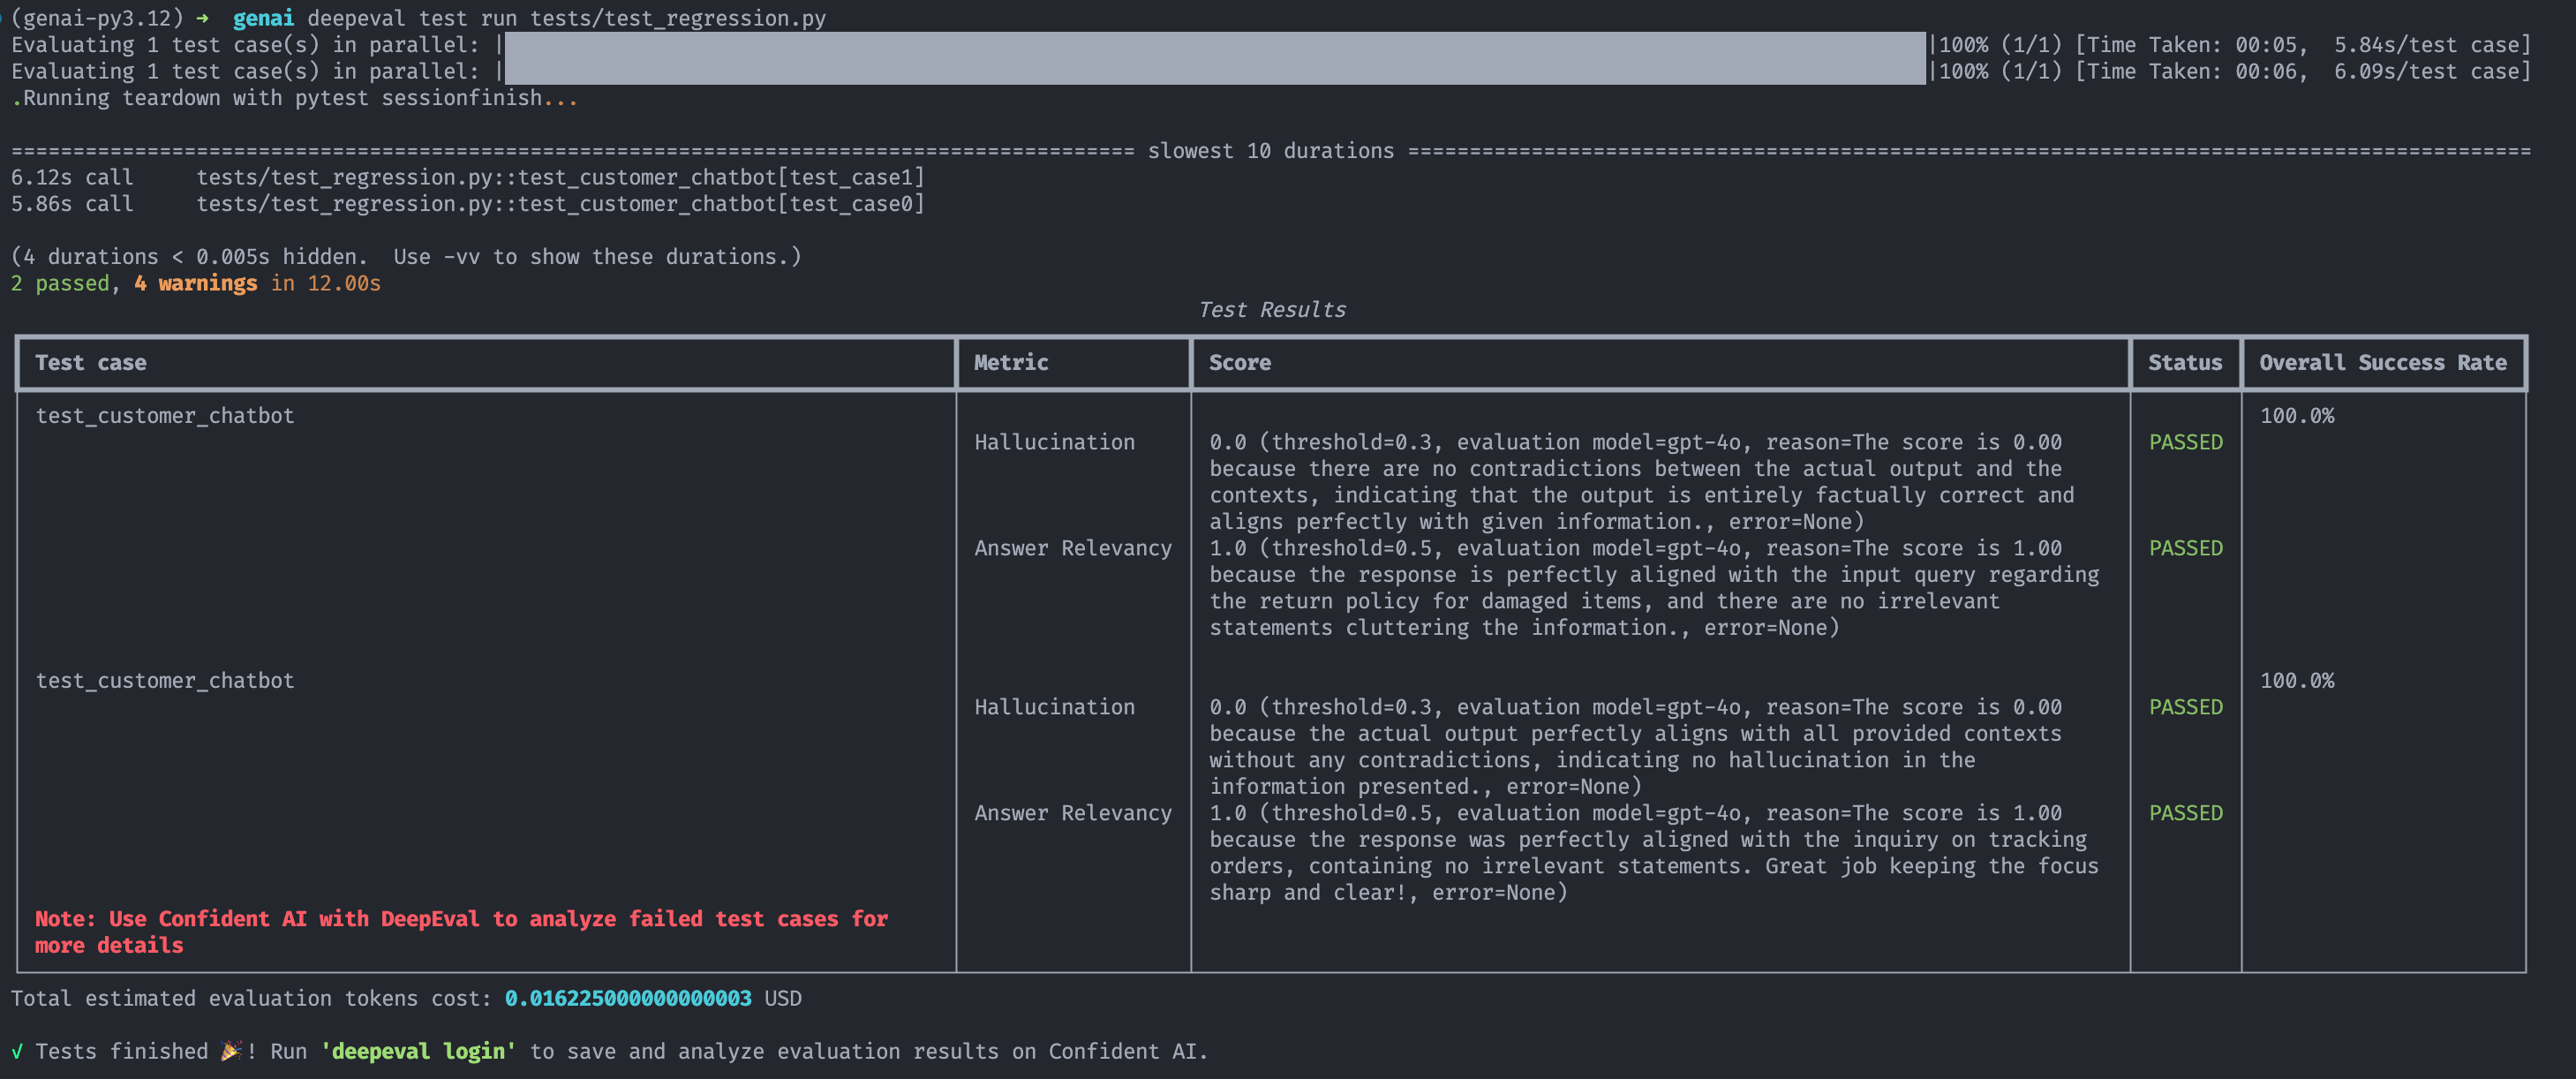
2. Regression Testing
Regression testing ensures that improvements to your LLM system don't inadvertently break existing functionality.
Example with DeepEvals:
import pytest
from deepeval import assert_test
from deepeval.dataset import EvaluationDataset
from deepeval.metrics import AnswerRelevancyMetric, HallucinationMetric
from deepeval.test_case import LLMTestCase

first_test_case = LLMTestCase(
    input="What is your return policy for damaged items?",
    actual_output="Our standard return policy allows returns within 30 days of purchase. For damaged items specifically, we offer a full refund or replacement if reported within 7 days of delivery. Please include photos of the damage when submitting your claim.",
    context=["Return Policy: Items can be returned within 30 days of purchase for a full refund.",
             "Damaged items must be reported within 7 days of delivery with photographic evidence.",
             "Replacements for damaged items are subject to inventory availability."]
)

second_test_case = LLMTestCase(
    input="How do I track my order?",
    actual_output="You can track your order by logging into your account on our website and navigating to the 'Order History' section. Alternatively, you can use the tracking number provided in your order confirmation email on our tracking page or directly on the shipping carrier's website.",
    context=["Orders can be tracked through customer accounts under 'Order History'.",
             "Tracking numbers are provided in order confirmation emails.",
             "Tracking can be done on our website or directly with the shipping carrier."]
)

dataset = EvaluationDataset(test_cases=[first_test_case, second_test_case])


@pytest.mark.parametrize(
    "test_case",
    dataset,
)
def test_customer_chatbot(test_case: LLMTestCase):
    hallucination_metric = HallucinationMetric(threshold=0.3)
    answer_relevancy_metric = AnswerRelevancyMetric(threshold=0.5)
    assert_test(test_case, [hallucination_metric, answer_relevancy_metric])
3. Adversarial Testing
Adversarial testing probes the boundaries of your LLM's capabilities by intentionally providing challenging inputs.
4. Hallucination Testing
Hallucination testing focuses on detecting when an LLM generates factually incorrect information presented as true.
Example with DeepEvals:
from deepeval import evaluate
from deepeval.metrics import HallucinationMetric
from deepeval.test_case import LLMTestCase

# More comprehensive context documents
context = [
    "The annual tech conference was held in San Francisco last week. Over 5,000 attendees participated in workshops and keynote sessions.",
    "The keynote speaker was Dr. Sarah Chen, who discussed advances in quantum computing and its implications for cybersecurity.",
    "Conference attendees received a complimentary laptop bag and water bottle with the conference logo.",
]

# Input query to the LLM
input_query = (
    "What did Dr. Chen talk about at the conference and how many people attended?"
)

# Actual output from the LLM application
actual_output = "Dr. Sarah Chen gave a keynote presentation about quantum computing and cybersecurity at the tech conference in San Francisco, which was attended by 5,000 people. She also announced a new quantum research initiative and distributed free quantum computing textbooks to all participants."

# Create test case with the updated information
test_case = LLMTestCase(input=input_query, actual_output=actual_output, context=context)

# Configure hallucination metric with appropriate threshold
metric = HallucinationMetric(threshold=0.5)

# Measure hallucination in the response
metric.measure(test_case)
print(f"Hallucination Score: {metric.score}")
print(f"Explanation: {metric.reason}")

# Evaluate test cases in bulk
evaluate([test_case], [metric])
Implementing a Comprehensive Testing Strategy
To effectively test your LLM application, you should integrate multiple testing approaches into a single coherent testing strategy.
Conclusion
Testing LLM-based applications presents unique challenges that require specialized approaches. By combining prompt testing, regression testing, adversarial testing and hallucination testing, you can build robust AI systems that deliver reliable, safe, and high-quality user experiences.
DeepEvals provides a comprehensive framework for implementing these testing techniques, allowing developers to rigorously evaluate their LLM applications throughout the development lifecycle.
Remember that testing LLMs is fundamentally different from testing traditional software.